Product Overview
This solution provides a complete Razorpay payment gateway integration for ASP.NET applications using C#. It follows Razorpay’s official architecture and is designed for real-world production systems.
Functional Aspects – Payment Workflow
This section explains what happens during a payment, from initiation to final confirmation.
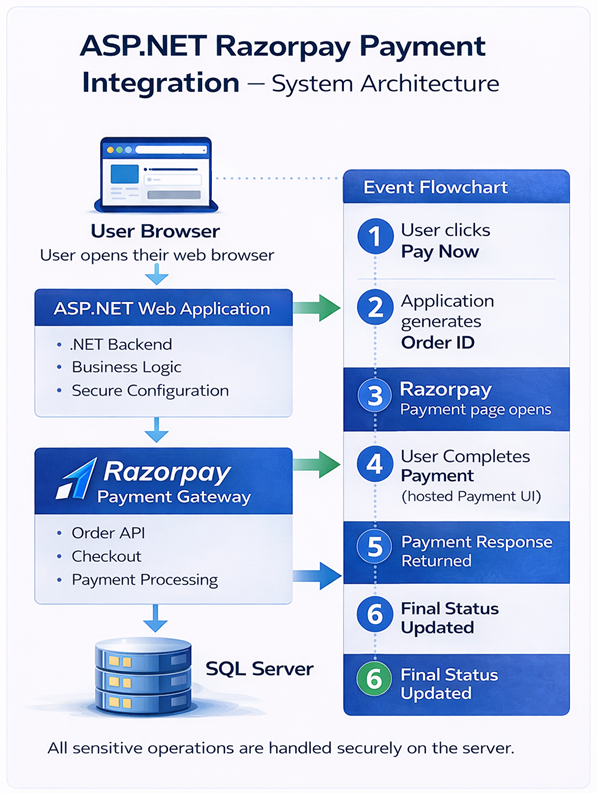
User clicks the Pay Now button.
Server generates Razorpay Order ID.
Hosted secure payment UI opens.
User completes payment.
Server verifies payment authenticity.
Database update and email notification.
Security & Reliability
- No card or UPI data stored on the server
- PCI-DSS compliant Razorpay Checkout
- Strict server-side verification
- Protection against tampering & replay attacks
Technical Aspects – End-to-End Integration Guide
This section explains how an end user (developer) can integrate Razorpay payments into an ASP.NET project from start to finish. It describes what happens at each stage and why each step is required.
The integration strictly follows Razorpay’s recommended server-side payment architecture to ensure security, reliability, and compliance.
Step 1: Create Razorpay Account
The first step is to create a Razorpay account. This account is used to manage payments, view transactions, and generate API credentials.
- Sign up at https://razorpay.com
- Log in to the Razorpay Dashboard
- Enable Test Mode for development
Test Mode allows you to simulate payments without real money.
Step 2: Generate API Keys
Razorpay provides two credentials: Key ID and Key Secret. These are used by your ASP.NET server to communicate securely with Razorpay APIs.
- Generate keys from the Razorpay Dashboard
- Use Test Keys during development
- Use Live Keys only in production
Important: API keys must never be exposed in client-side JavaScript.
Step 3: Configure API Keys in Web.config
Store Razorpay credentials securely in the
Web.config file.
This ensures keys are accessible only to server-side code.
<appSettings>
  <add key="RazorpayKeyId" value="rzp_test_xxxxx" />
  <add key="RazorpayKeySecret" value="xxxxxx" />
</appSettings>
Your ASP.NET code reads these values at runtime.
Step 4: Install Razorpay NuGet Package
Razorpay provides an official .NET SDK to simplify API communication.
- Open NuGet Package Manager
- Search for Razorpay.Api
- Install the package
This SDK is used for order creation and server-side verification.
Step 5: Generate Razorpay Order ID (Server-Side)
Order ID generation is the most important step. Every payment must be associated with a unique Razorpay Order.
The order is created on the server because:
- Amount cannot be manipulated by the client
- Each payment is uniquely traceable
- Fraud and replay attacks are prevented
// Create Razorpay Order (Server-side)
RazorpayClient client = new RazorpayClient(keyId, keySecret);

var options = new Dictionary<string, object>
{
    { "amount", amountInPaise }, // Example: 50000 = ₹500
    { "currency", "INR" },
    { "receipt", "order_rcpt_001" }
};

Order order = client.Order.Create(options);
string razorpayOrderId = order["id"].ToString();
The generated Order ID is sent to the client to initiate payment.
Step 6: Open Razorpay Checkout (Client-Side)
Razorpay Checkout is opened using Razorpay’s hosted UI. This UI securely handles card, UPI, and wallet details.
Your application:
- Does NOT handle card data
- Does NOT store sensitive payment details
- Only receives payment response IDs
Step 7: Verify Payment Signature (Server-Side)
After payment completion, Razorpay returns:
- Payment ID
- Order ID
- Signature
The server must verify the signature using HMAC SHA256. This ensures the payment response is authentic.
Payments must never be marked successful without signature verification.
Step 8: Save Transaction & Send Emails
Only after successful verification:
- Transaction is saved in the database
- Order status is updated
- Success email is sent to the user
If verification fails:
- Transaction is marked as failed
- Failure email is sent
- No success assumptions are made
This guarantees consistency between: Razorpay → Application → Database → Email.
Need Help or Customization?
Dedicated support is available for setup, configuration, and integration.